Focus: Understanding ISO, aperture, and shutter speed for photography beginners.
Keyword: Camera settings guide
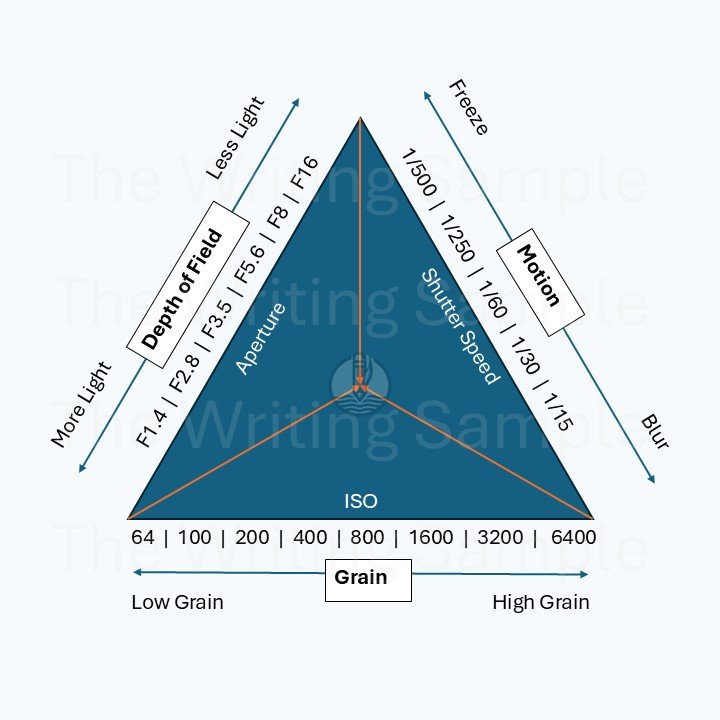
Photography combines creativity and technical skill, and understanding your camera’s settings is the first step to mastering the craft. ISO, aperture, and shutter speed are the three essential components. They determine how light interacts with your camera. These components shape every photo you take. Known as the “exposure triangle,” these settings work together to achieve the perfect exposure. In this guide, we’ll break down each setting. We will show you how they interact. This will help you take control of your photography.

What is ISO?
ISO controls your camera sensor’s sensitivity to light. A lower ISO setting (e.g., ISO 100) captures less light, making it ideal for bright conditions, while a higher ISO setting (e.g., ISO 1600 or higher) makes the sensor more sensitive to light, which is useful in darker environments.
- Pros of Low ISO: Sharper, clearer images with less noise.
- Cons of High ISO: Increased noise (graininess) in photos.
Example Use Case:
- Outdoor photography in bright sunlight: Use ISO 100.
- Indoor photography without a flash: Use ISO 800–1600, depending on the light.
What is Aperture?
Aperture refers to the size of the opening in your lens that lets light enter. It is measured in f-stops (e.g., f/2.8, f/8, f/16). Lower f-stop numbers mean a larger aperture, letting in more light and creating a shallow depth of field (blurry background). Higher f-stops mean a smaller aperture, keeping more of the image in focus.
- Wide Aperture (f/2.8): Great for portraits or isolating a subject.
- Narrow Aperture (f/16): Ideal for landscapes or group photos.
Example Use Case:
- Portrait photography: Use f/2.8 for a creamy background blur.
- Landscape photography: Use f/11–f/16 to keep the scene sharp.
What is Shutter Speed?
Shutter speed controls how long the camera’s shutter remains open, measured in fractions of a second (e.g., 1/500, 1/30). A fast shutter speed freezes motion, while a slow shutter speed captures motion blur.
- Fast Shutter Speed (1/1000): Perfect for action shots like sports or wildlife.
- Slow Shutter Speed (1/30): Ideal for capturing light trails or low-light scenes with a tripod.
Example Use Case:
- Freezing a bird in flight: Use 1/1000 or faster.
- Capturing a waterfall’s motion blur: Use 1/10 with a tripod.
Bringing It All Together: The Exposure Triangle
ISO, aperture, and shutter speed are interconnected. Adjusting one affects the others, and balancing them is key to proper exposure.
- Scenario 1: Indoor Low Light
- Increase ISO to 1600, open aperture to f/2.8, and use a slower shutter speed (1/60).
- Scenario 2: Outdoor Bright Light
- Lower ISO to 100, narrow aperture to f/16, and use a fast shutter speed (1/500).
A cheat sheet is provided below for quick reference.
Conclusion
Mastering ISO, aperture, and shutter speed empowers you to take creative control of your photography. Experiment with these settings to see how they transform your images, and don’t hesitate to practice in different lighting conditions. Share your favorite shots or questions in the comments!
Cheat Sheet: Camera Settings at a Glance
| Setting | Purpose | When to Use | Example Values |
|---|---|---|---|
| ISO | Sensor sensitivity to light | Bright sunlight → Low ISO (100-200) | ISO 100, ISO 800 |
| Aperture | Controls light entry & depth of field | Portraits → Wide aperture (f/2.8) | f/2.8, f/16 |
| Shutter | Controls motion & light entry duration | Action → Fast shutter (1/1000) | 1/1000, 1/30 |


0 Comments